Q:"How to trim a video on Windows 10?"
If you're a new user with your first Windows 10 computer, or just switched from Mac to Windows 10, you may not be familiar with how to quickly trim a video without resorting to any third-party tools. Like the above user, you might still be on your way. It doesn't matter. Follow us to learn popular solution in this article. We'll share the hidden video editors, both Photos and Movies & TV, to help trim video on Windows 10. In addition, a lossless video trimmer for Windows will be introduced for your further reference.

- Way 1. Photos App [Trim a Part + Trim Multiple Parts]
- Way 2. Movies & TV
- Way 3. VideoKit for Windows
Part 1. How to Trim Video on Windows 10 - Photos
Windows 10 comes with a default app called Photos that has a hidden editor to help basically trim videos. If you don't want to install any extra software, then it can be the best option. Now we'll walk you through the steps to quickly trim and create home-made videos. According to your actual needs, get to know whether to trim a part or multiple parts on Windows 10 using this app.
Step 1: Open Photos App. Firstly find the video file you want to trim on your computer drive and then right-click Open with > Photos.

Step 2: Adjust Settings. Once it's launched, click on the video and you'll see a menu bar come across the video. Click "Edit & Create" > "Trim".

Step 3: Set Trimming Section. Now simply move the starting and ending sliders to select the video segment you want to keep. By clicking on the "Play" icon, you can preview how the video looks after trimming.

Step 4: Start to Trim Video. When the trimming part of the video is set ready, click on the "Save a Copy" or "Save as" button at the top. Depending on the file size, quality, and resolution, it can take some time to create a copy of the trimmed video for you.

Step 5: Edit the Name of the Trimmed Video. Once done, go back to the same folder where you've saved the original video file, and you will find the newly cut video with "Trim" at the end of the file name. You can then rename the trimmed version as you like so that you can easily recognize it later.
1.1 How to Trim a Video
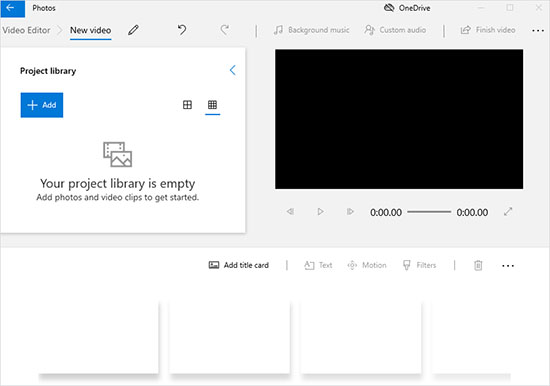
Step 1: Open Video Editor. Go to the search button in the lower left corner of Windows 10 to type "Photos" or "Video Editor".
Step 2: Create New Project and Add Video. Click "New Video" > "New Video Project" and name your video. Then you can hit the "+ Add" button to import your video file from the PC, collection or the web.

Step 3: Trim Video on Windows 10 Photos App. Drag the video file from the "Project library" to the "Storyboard". You can drag the same source many times. Then select one in the storyboard > click "Trim" option" > move the blue sliders to choose desired section > press "Done". Repeat the operation to trim multiple clips.

Step 4: Save Multiple Videos into One. Now you can click on the "Finish Video" button in the upper right corner > customize video quality and press "Export" to save all sections into a whole one.
1.2 How to Trim Multiple Parts of a Video and Combine Together
Part 2. How to Trim Video on Windows 10 - Movies & TV
You may not realize that there is another default video cutter for Windows 10 - Movies & TV, that functions well to trim videos without effort. When you're playing and watching a video file in this tool, trim straightly on your Windows computer by following these similar yet simple steps below.

- Step 1: Confirm the target video and open it with "Movies & TV" on Windows 10;
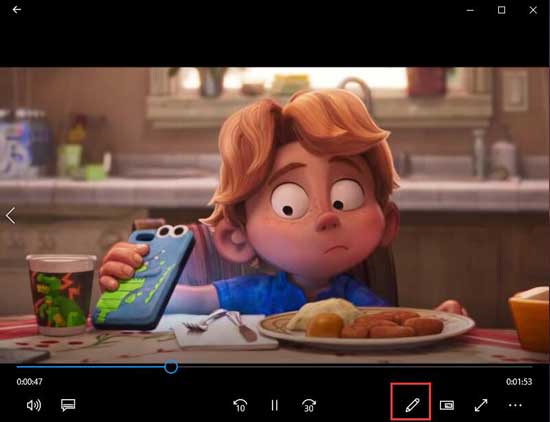
- Step 2: Find the pencil-shaped Edit icon in the bottom right corner of the playback window;
- Step 3: Click Edit option and select "Trim" tool in the popup menu;
- Step 4: Your video will load up in the Photos app and stay in the trimming window;
- Step 5: Drag the video over the timeline in playback windows to complete the trimming process and finally save it on Windows 10.
Part 3. How to Trim Video in Windows 10 without Losing Quality
VideoKit - Video Cutter is a professional video editing toolbox with a sought-after video trimmer to cut videos in 1:1 output quality on Windows 10. It saves clips to popular formats and compatible devices, like HD MP4, WMV, FLV, MOV, AVI, iPhone, Android, Windows Phone, game console, smart TV, etc. Other than that, its diversified cutting methods have greatly improved the accuracy. With the advanced technology, users can even enjoy 60X faster speed to efficiently finish video editing operations.

- Trim video in Windows 10 with high accuracy
- Lossless trimming quality and 60X cutting speed
- Support streaming video and audio formats
- Customize aspect ratio, codec, resolution and more
- Built-in editor to merge, repair, compress, effect, etc.
Step 1 Add a video file to the program
Launch VideoKit on your Windows 10 and run "Video Cutter". Simply drag and drop a video file that you'd like to cut into the main window of the program. Or click the "Open" button to add from local folder.

Step 2 Trim a video on Windows 10
There are two choices to elect trimming segments. The commonly-used one is to move the blue sliders to define time points. The other is to set the temporal interval with start time and end time manually. Both options can help you enhance the efficiency and accuracy to cut files.

If you want to trim the video into multiple segments from the same source, you can click the "+" icon to create more clips in the list and tick "Merge Segments" to combine them.
Step 3Select the output format
Once the video length is set, click the "Format" button to choose the output format according to your needs. The two modes, lossless high-speed mode and encoding mode, out there, are available to trim videos. The former keeps original quality while the later allows to customize and edit videos.

Step 4 Save trimmed videos on Windows 10
Now click the "Start" button to begin trimming and saving video clips. Wait for a minute till it completes. You can then have a check and view locally using the "Open The Output Folder" option.
Conclusion:
All the cutting worries can go away as long as you carefully check what we offer in this article. The default Photos app on Windows 10 can help trim not only a part of your video but also multiple clips, which can be a best solution to take into consideration. Also, you can use free Movies & TV on your PC to easily get this job done. For better trimming experience and 100% original quality output, VideoKit can be used as well. No matter which solution you ask to trim video on Windows 10, don't hesitate to try!


