Q: "I have completed a series of interviews on Voice Memo. I would like to combine them into one memo. Is that possible?" - Jay Gray

Voice Memo is a built-in app on iOS devices, which helps users to conveniently record any audio, such as schooling lectures, singing voice, voice-over, interviews, and so forth. It also considerably facilitates users in recording something momentous, to say the least. But you know, what people demand is changing constantly. According to a new study, it is found that a good few people wonder how to combine voice memos after recording. To answer the question, this post is written here, from which you will know well 5 different methods to achieve it on different devices.
- Part 1. Best Way to Join Voice Memos - VideoKit (Windows and Mac)
- Part 2. How to Join Voice Memos - Audacity (Windows, Mac, and Linux)
- Part 3. How to Join Voice Memos - iMovie (Mac)
- Part 4. How to Join Voice Memos on iPhone
- Part 5. How to Merge Voice Memos Online
- Tips. How to Transfer Voice Memos to Computer
- Conclusion & Comparison
Part 1. How to Combine Voice Memos Losslessly - VideoKit
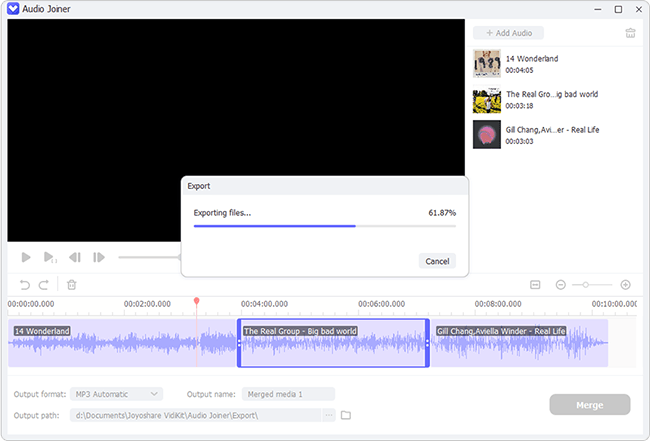
VideoKit (originated from anikeep Video Joiner), one of the most practical and excellent programs, is expressly designed to join any audio recordings or video clips without compromising on quality. With it, not only can you merge files but also easily cut and edit them on your preferences. To be geared to the needs of users of all ages, this video joiner is much user-friendly. Regardless of a professional or amateur, you are able to operate it without any trouble.
More than that, the wide compatibility is one of its remarkable characteristics. No matter what format your voice memos are, VideoKit can assist you in merging them with no difficulty. To offer more flexibility and selectivity, it is equipped with two merging modes for both lossless join and audio customization. Remember to transfer voice memos to your computer before merging them on desktop.

- Accept files in various formats like MP3, MP4, AAC, ALAC, M4A, etc.
- Merge audio files on Windows 10 and Mac at 60X blazing-fast speed
- Merge an unlimited number of video and audio recordings losslessly
- Support individual and batch audio conversion and audio editing
- Offer the lossless high-speed mode and the flexible encoding mode
- Perfect audio by cutting, converting, adding sound effects, and more
Step 1Add Voice Memos into VideoKit
Download and install the proper version (Mac or Windows) of VideoKit on your computer. After running it, open the video joiner on the "Convert" panel, then tap the "Open File" button at the bottom of the screen to browse and add your voice memos. More conveniently, you can directly drag and drop them to the program.

Step 2Select Merging Mode and Output Format
Simply press on the "Format" button right next to the "Open File" button to choose either the high-speed mode or the encoding mode to combine multiple voice memos. Before choosing, please know that the high-speed mode is used to merge files of the same format without quality loss while the encoding mode allows you to customize files besides joining. Next, pick an output format for your merged voice memos.
Note: After determining the output format under the encoding mode, you are permitted to click the gear icon to set up codec, channel, sample rate, bitrate of the merged audio file.

Step 3Remove Needless Content from Voice Memos
Once selected the merging mode and the output format, click on "OK" to go back. In the first interface, play and check your voice memos one by one. For unwanted sections, you are able to delete them by moving the blue timeline below the preview window. Also, rename and rearrange every file at your will if needful.

Step 4Optionally Edit Voice Memos
This step is just for those who choose to combine voice memos using the encoding mode. For them, trimming files, applying sound effects, adjusting audio volume, changing audio mix ratio, etc. can be done easily and quickly.

Step 5Combine Voice Memos
Now, just lightly hit on the "Convert" button to start the joining process. A moment later, your voice memos will be merged into a seamless audio file and saved in a "converted" file of the local file folder by default.

Part 2. How to Combine Voice Memos on Audacity
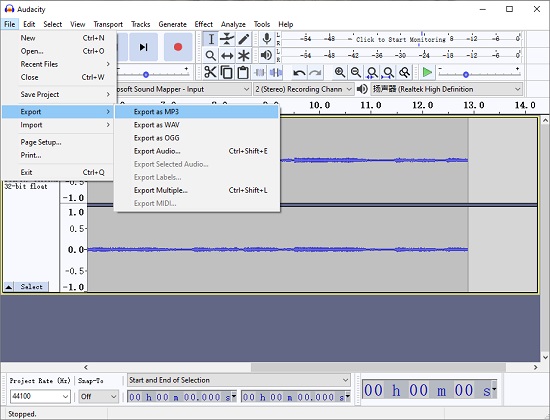
You can make use of Audacity to combine two or more voice memos. Audacity is a multi-track audio editor for Windows, macOS, Linux, etc. As a free and open-source audio editing tool, Audacity is able to do a number of things. For example, it can record, trim, cut audio files, increase audio volume, and more. If you want to make Audacity combine tracks from your Voice Memos app, you can follow the steps below.

Step 1: After installing Audacity, double click to run it on your computer;
Step 2: Next, select the "File" option from the top menu and press "Open" to add one of your voice memos from your computer local files;
Step 3: In the resulting window, navigate to File > Open again to add another voice memo you want to merge, and your audio will be opened in a new window;
Step 4: Now you need to press Ctrl + A and then Ctrl + C to copy the entire part of the second audio file you opened, then press Ctrl + V to paste it in the first Audacity window you opened; you can place the copied audio track to any position;
Step 5: Press Ctrl + A again to select all the voice memos you added, and finally you can go to File > Export and choose an audio output format according to your needs.
Part 3. How to Merge iPhone Voice Memos on iMovie
The popularity of iMovie grows as it makes it easy for users to browse clips and create Hollywood-style style movies. This powerful tool has a variety of stunning features, which allow you to add titles, music, special effects to your video and audio files. If you are running Mac operating system, you can get started to learn how to combine clips in iMovie.

Step 1: To begin with, you are supposed to open iMovie on your Mac computer, then go to File > New Project to create a new iMovie project;
Step 2: Now you can use the drag-and-drop function to add your voice memos to iMovie's timeline;
Step 3: You can reposition your files easily and finally, you are free to press the Share button from the top menu and then select "File" as your export option; you can also choose to send your merged voice memos to iTunes;
Step 4: Having chosen the File, you need to adjust the format, resolution, quality, etc. in the dialogue box that shows up.
Part 4. Merge Voice Memos on iPhone - Hokusai Audio Editor
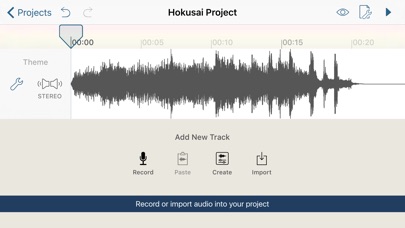
Hokusai Audio Editor is a multitrack audio editor running on iOS devices. Developed with a beautiful clutter-free interface, it has the ability to easily record, cut, copy, paste, polish (like adding a suite of filters or special effects), and mix audio tracks. Powerfully, the audio editor can edit many audio files side-by-side and export them to MP4 format.
Even, transferring your voice memos to computer or another application on the iPhone and uploading them to cloud service is nothing difficult for it. Even if you are demanding in terms of combining audio files, it could nicely satisfy you. The below will guide you to do it.

Step 1: The first thing to do is saving your voice memos to the Files app with the "Share" button in Voice Memo app, then download and install Hokusai Audio Editor on your iPhone from App Store;
Step 2: After that, tap on "Import" to input your voice memos from the Files app to the software; note that the program does not support importing a bunch of files, so you need to add them one by one;
Step 3: Now, play back all the loaded audio files, and if there is something undesired, you can cut it before merging them;
Step 4: Once done, click on a spanner icon in the upper right corner and then in a drop-down menu, please choose "Share Audio", and in this way, your voice memos will be combined to the Files app.
Part 5. How to Merge Voice Memos Together - Online Audio Joiner
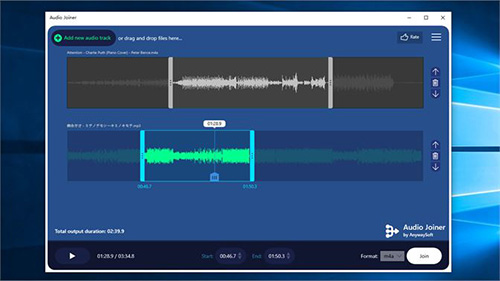
In consideration of the situation where some might prefer to combine voice memos without downloading anything, Online Audio Joiner is recommended. It supports joining audio files of various formats quickly and gives the ability to convert them to MP3, M4A, WAV, FLAC, etc. For your convenience, below concentrates on how to make use of it to combine voice memos at every step.

Step 1: Open Online Audio Joiner in the browser and get into the main interface of this online joiner;
Step 2: Click "Add tracks" to import voice memos to be combined or use the drag-and-drop function to add files;
Step 3: Touch the "Play" button to preview them one after the other. To cut something undesired off them, move the blue slider or set "Start" time as well as "End" time;
Step 4: If required, tap on the up arrow or down arrow button to rearrange the sequence of each voice memo file. Then, specify an output format and press on "Join" to combine your voice memos.
Tips. How to Send Voice Memos to Computer
There are several ways for you to transfer your voice memos to your computer in batch or one by one. By doing so, you will be able to free up your iPhone space and make an identical copy of your important data to avoid accidental deletion.
Use iTunes

Step 1: Install and open the latest version of iTunes on your computer, then connect your iPhone to your computer;
Step 2: Find and click on your device icon, then choose the "Music" option from the sidebar;
Step 3: Tick the checkbox of "Include voice memos", then press the "Apply" button to confirm;
Step 4: After the process is finished, you will be able to find your iPhone voice memos in a computer folder named Voice Memos.
Use the built-in Share feature
Another easy way to save your iPhone voice memos in computer is to take advantage of the Share feature of the Voice Memos app. You can share your voice memos to Google Drive, Gmail, OneNote, etc. After that, you are able to gain access to your voice memos by simply signing into the corresponding account.
Step 1: Run the Voice Memos app on your iPhone and then click to select the voice memo you would like to transfer to your computer;
Step 2: Press the pop-up "More" icon and select the "Share" option, then you will be capable of sending your voice memo to "Messenger", "Mail", "Chrome", and more;
Step 3: Later, you can use your computer to check the voice memos you sent and then download to save it.
Use iCloud
iCloud device can sync all your voice memos from your iPhone to your computer at once. More than that, with iCloud Drive on, you will be capable of sharing various kinds of documents across your devices.
Step 1: Open the Settings app on your iPhone and then navigate to [your name] > iCloud > Voice Memos;
Step 2: Sign in your Apple ID on your computer, then select the "Voice Memos" option and you will see many audio files that transferred from your computer, and you can download the voice memos you need now.
Conclusion & Comparison
Upon reading this article, you must be at least aware of 5 ideas on how to combine voice memos. All of them are achievable. As for which one you decide to work with, it is all up to your requirements. With a desire for lossless and instant merging and flexible editing, VideoKit is highly recommended. Without using additional tools, do it online. At all events, hopefully, what you choose will satisfy you.
| VideoKit | Audacity | iMovie | Hokusai Audio Editor | Online Audio Joiner | |
| Applicability | Windows, Mac | Windows, Mac, Linux | Mac | iOS devices | Online |
| Easy to Use | Yes | No | No | Yes | Yes |
| Mode to Merge | Two modes | Single | Single | Single | Single |
| Quality Loss | No | Yes | Yes | Yes | Yes |
| Supported Formats | Nearly all | WAV, AIFF, MP3 | 8 | Formats that iOS supports | MP3, M4A, WAV, FLAC |
| Speed of Merging | 60X fastest speed | Fast | Fast | Decided by iDevice performance | Depend on the network condition |
| Editing Options | Yes | Yes | Yes | Yes | No |
| Target User | Beginners and professionals | Professionals | Professionals | Apple users preferring merging on mobiles | Beginners |


