Q:"The pictures taken with my iPhone 7 with iOS 11 are transferred to my Mac OS X 10.11. However, I have problem in viewing them directly on my Mac. Why? Could you please show me workable solutions? What if convert it to other format that has broad compatibility?" - Larsen
Though HEIC format has been released for a long time in iOS 11, there are still some Apple users who don't get catch with hot discussion topics about this novelty. Just as Larsen said, HEIC files cannot be viewed straightly on Mac, which is caused by its unfriendly compatibility with specific systems, such as iOS 11 devices, macOS High Sierra, Android Pie and Microsoft Windows 10. Apple users like Larsen who would like to upgrade Mac version to macOS High Sierra can effectively solve this problem while others who are unwilling can refer to the mentioned 2 ways in this article to convert HEIC to JPG on Mac effortlessly.
- Part 1. Convert iPhone HEIC Files to JPG on Mac with Reliable 3rd-party Tool
- Part 2. Convert iPhone HEIC Files to JPG on Mac via Handy Dropbox for Mac
Part 1. Powerful HEIC to JPG Mac Converter – anikeep HEIC Converter
Specialized in converting iPhone HEIC images to other popular formats, such as JPG, PNG, GIF, BMP, TIFF, etc. in high quality, anikeep HEIC Converter is absolutely an ideal program to sufficiently fit for your needs. Quite easily, the whole conversion process can done within few steps.
Taking the aid of this HEIC to JPG converter Mac tool, you can import a large quantity of HEIC files at a time and convert them in batch. Before conversion, you are enabled to set resolution and quality based on your own preference. More than that, it also offers ability to keep EXIF metadata info as well as original aspect ratio. All images comes from this unique file can be exported in no time without privacy leakage.
Key Features of anikeep Mac HEIC to JPG Converter:
Support all kinds of HEIC files comes from iOS 11 devices
Convert HEIC to JPG on Mac without damaging original quality
Have options to adjust resolution and quality in flexible way
Support diverse output formats: JPG, GIF, PNG, BMP, WEBP, etc.
Preserve aspect ratio and EXIF info according to personal preference

Step 1Sync HEIC files to Mac and run program
Initially, connect your iPhone to Mac with an original USB cable to finish syncing all needed HEIC images. After that, double click the icon on your desktop to get anikeep HEIC Converter launched.
Step 2Import HEIC files to anikeep on Mac
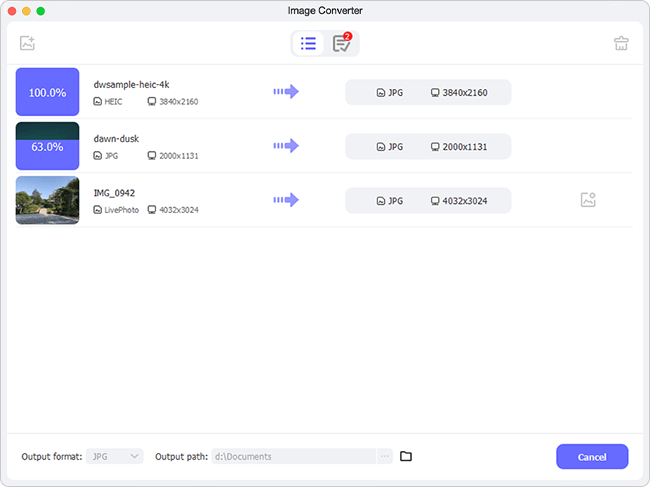
There are two available methods to add HEIC images to the main interface of anikeep HEIC Converter: 1) tap on "+" button at the left corner to browse local files; 2) drag and drop ready HEIC photos to conversion list. In this step, you are allowed to convert HEIC files one by one or in bulk in the way you like.

Step 3Set output format and confirm related options
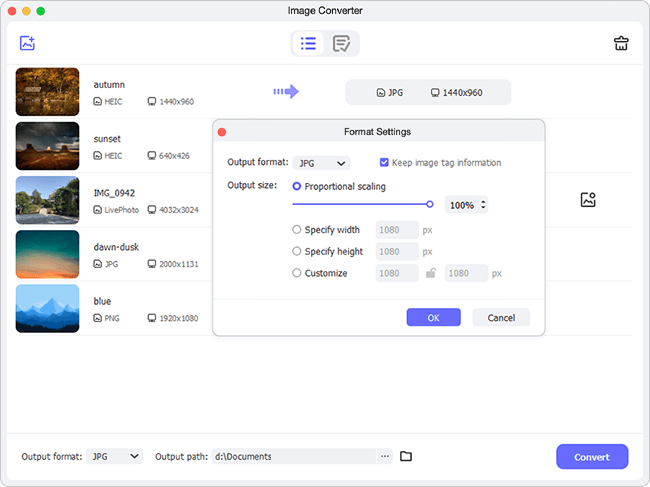
Having added all desired HEIC files, you ought to click the "Format" panel to choose "JPG" as output format. At the same time, adjust resolution & quality, or decide whether keep aspect ratio & EXIF info as per actual requirements.

Step 4Convert HEIC to JPG on Mac Instantly
It's time to press "Convert" button at the right bottom to start to convert HEIC files to JPG. Once the conversion comes to end, one window will pop up soon to show all converted files. Also, you can get out of trouble of viewing your HEIC files completely.
Video Tutorial: How to Convert HEIC to JPG on Mac
Part 2. Simple HEIC to JPG Mac Converter – Dropbox for Mac
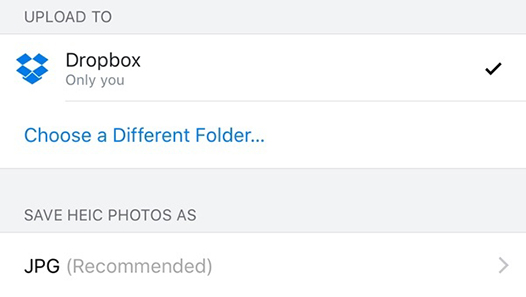
Alternatively, you can adopt Dropbox to accomplish HEIC to JPG conversion on Mac. What you have to do is just set up the settings before uploading HEIC files to Dropbox. To do that, go to run Dropbox app on your iPhone and then hit person icon. Then go for "Settings" > "Camera Uploads" > "SAVE HEIC PHOTOS AS" to select "JPG". This file-sharing function can automatically convert HEIC to JPG when you are going to upload iPhone files and sync them to Mac. Anyway, it's convenient to manage HEIC photos with Dropbox.


